I was standing in a security line at Rome Fiumicino when the woman in front of me started unzipping every compartment of her travel vest to find her passport. Chest pocket: lip balm. Left breast pocket: folded itinerary from 2022. Inner zip: nothing. She turned around and apologized to the entire queue. I pulled my passport out from under my shirt in about four seconds and did not make eye contact. That vest is not protecting her. It is advertising everything she has and where she keeps it.
I have been carrying my passport under my clothes since my first solo trip through Southeast Asia in 2018, and I have never once had a security problem, a pickpocket incident, or a "where did I put it" panic. What I have had is a simple system that takes about three minutes to set up at the start of a trip and then runs on autopilot for the rest of it. The VENTURE 4TH neck wallet is the core tool of that system. Here is how to use it properly, and how to build the layers around it so you never fumble at passport control or lose sleep in a hostel.
Your passport deserves better than a vest pocket that announces itself to every pickpocket on the Metro.
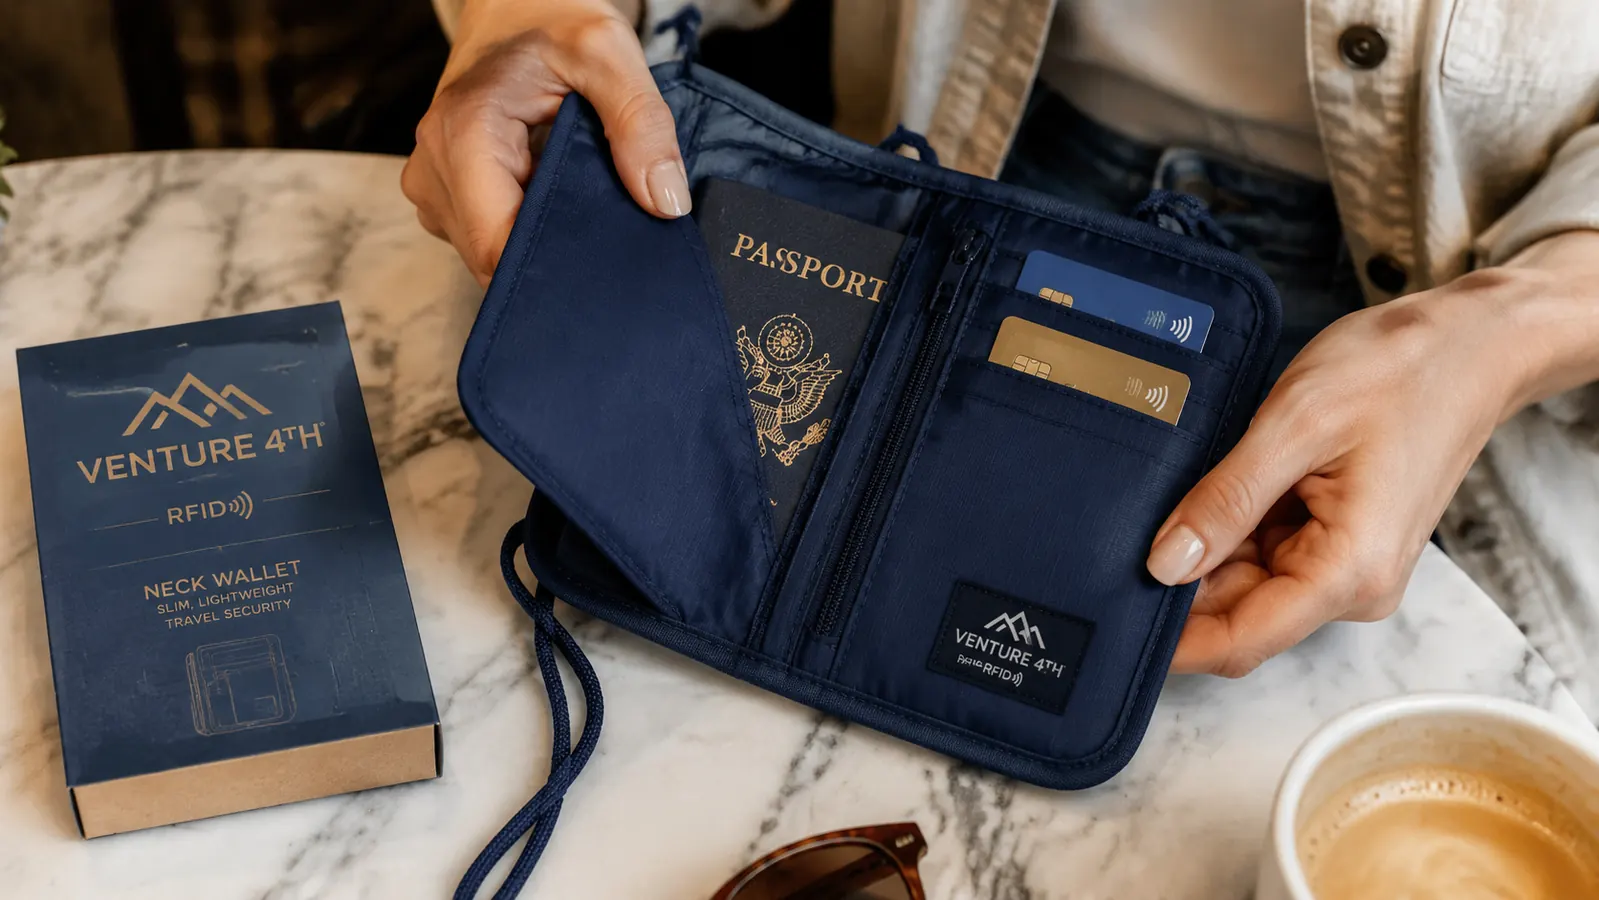
The VENTURE 4TH RFID neck wallet keeps your passport, two cards, and emergency cash flat against your chest and completely invisible under any shirt. Rated 4.6 stars across 12,000+ travelers.
Amazon Check Today's Price on Amazon →Step 1: Decide What Actually Lives in the Neck Wallet (Hint: Less Than You Think)
The biggest mistake I see travelers make with a neck wallet is treating it like a second wallet. They stuff in every card they own, their boarding pass, their travel insurance printout, their hotel reservation confirmation, and three pens. Then it is thick enough to show through a t-shirt and they have defeated the point entirely.
The neck wallet carries exactly four things: your passport, one backup credit card (not your daily card), a small amount of emergency cash in local currency (roughly the equivalent of $60-80 USD), and your travel insurance card or policy number written on a folded slip of paper. That is it. The VENTURE 4TH is designed with this in mind. Its main compartment is sized for a standard passport with a few thin items behind it. There are two card slots alongside. Keep the rest out. The neck wallet is your emergency layer, not your daily-spend pouch.
I learned this the hard way in Marrakech. I had overstuffed mine to the point where it sat two inches off my chest and I was reaching under my shirt every twenty minutes to find something. A local vendor noticed the motion and followed me for half a block. Lesson absorbed. Strip it back to the essentials, and the wallet disappears.
Step 2: Learn How to Wear It So It Actually Stays Hidden
The VENTURE 4TH has an adjustable cord that lets you position the wallet flat against your sternum. That is where it wants to sit. Not hanging loose at navel level where it swings when you walk, and not tucked inside your waistband where it digs in when you sit down. Flat against the sternum, cord adjusted so there is no drape or movement. When you reach down the front of your shirt collar to grab it, your hand goes straight to it in one motion.
Shirt matters more than most guides admit. A fitted cotton t-shirt will show the rectangular outline of a wallet if the wallet is thick. That is why you keep it thin (Step 1), and that is why slightly looser weaves and linen shirts are ideal travel companions. Button-down shirts and light layers are even better. The wallet vanishes. At passport control, you unbutton the top two buttons, reach in, and hand over the passport. Smooth, practiced, zero theater.
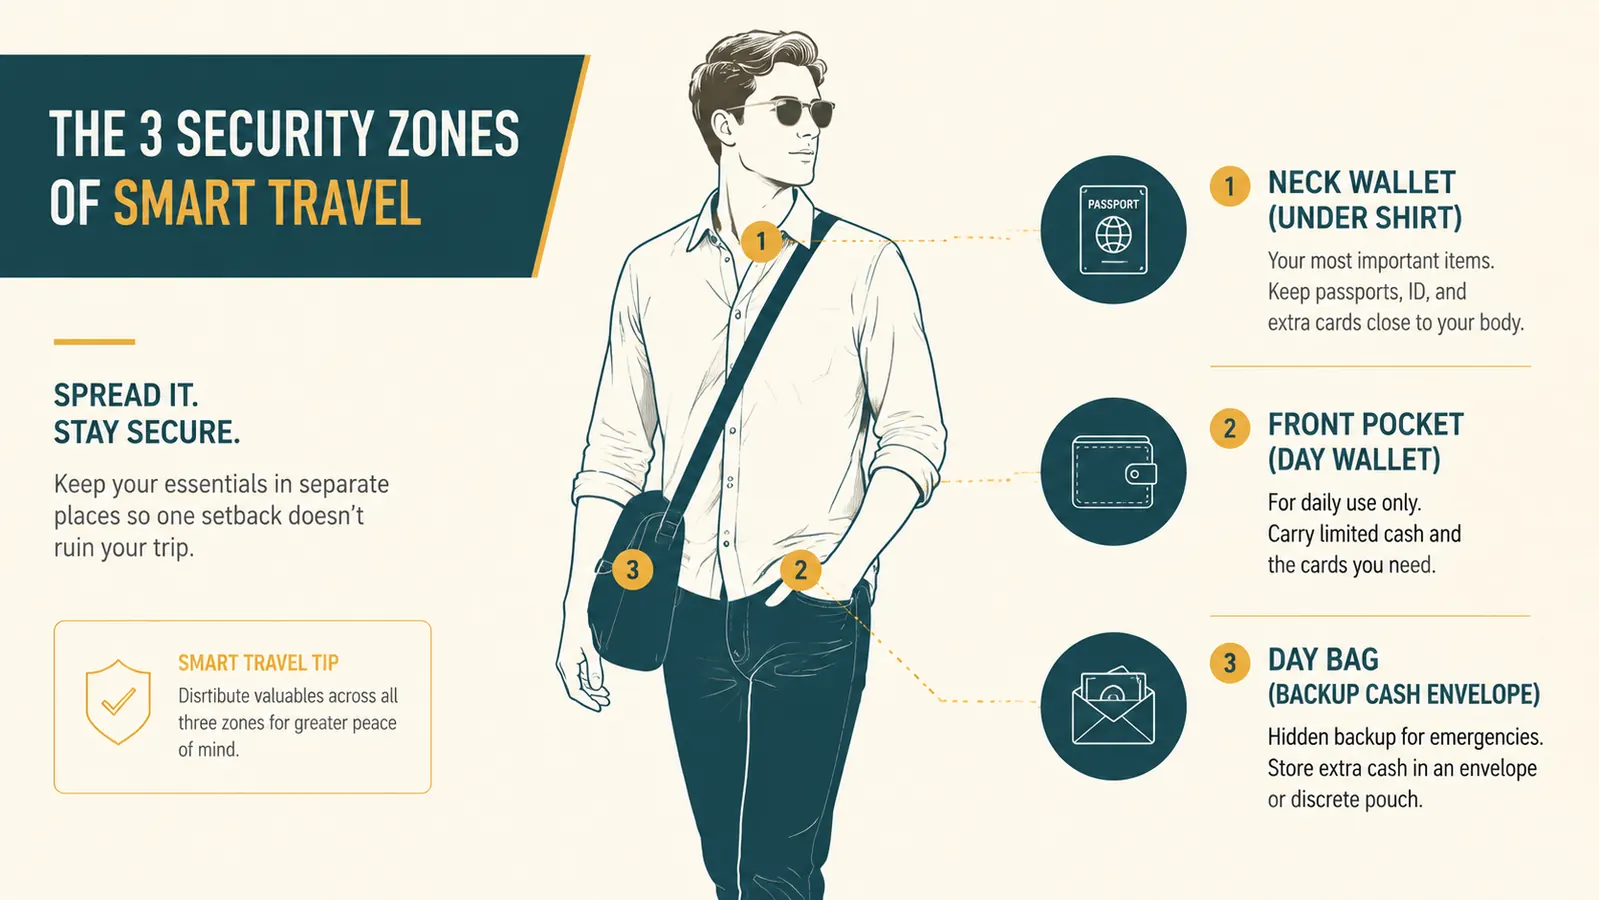
Step 3: Build Your Day Wallet System for Everything That Is Not the Passport
Here is where a lot of neck-wallet guides stop, and where the real system starts. Your neck wallet is your emergency layer. You should not be pulling it out at a coffee shop to pay for an espresso. That repeated reach-under-the-shirt motion is exactly the social visibility that makes the whole setup less useful. You need a separate daily spend wallet.
My daily wallet is a slim bifold that lives in my front jeans pocket. It holds my daily-use debit card, one backup credit card, the local cash I expect to spend that day (not all of it, just that day's budget), and my transit card if the city uses one. That wallet goes in my front pocket, not my back pocket. Front pocket pickpocketing is genuinely rare. Back pocket pickpocketing in crowded markets is not. This one switch, front pocket instead of back, eliminates most of the risk that people incorrectly try to solve with a travel vest.
The rest of your local currency stays in a sealed envelope inside your day bag's most interior zip pocket. Replenish the day wallet from the envelope every morning at the hotel. Never at an ATM on the street.
Step 4: Set Up the RFID Blocking Layer Before You Leave Home
The VENTURE 4TH is RFID blocking across all its card slots, which means someone walking past you with a contactless card skimmer will not be able to read your chip cards. This matters more than it did five years ago. Major transit hubs, busy tourist markets, and some hotel lobbies in high-traffic cities have seen documented skimming incidents. The protection is built in. You do not need to do anything to activate it. But you do need to set it up correctly at home before you travel.
Before your trip, load the neck wallet with your passport, your backup card, and your emergency cash. Practice the reach-under motion until you can pull the passport out in one smooth movement. This sounds silly until you are at a border crossing at 11 PM after a six-hour bus ride and you need to produce documents quickly without fumbling or looking uncertain. Muscle memory matters. Do the reach five times at home and you will never fumble in the field.
One setup note specific to the VENTURE 4TH: the card slots on the sides of the main compartment are tight when new and loosen slightly after a few weeks of use. If your backup card feels stiff to insert, work it in and out a few times the evening before you leave. By day three of the trip it will be perfectly broken in.
Step 5: Practice the Hand-Off at Border Crossings and Hotels
The two moments when you pull the passport out of the neck wallet in public are: border crossings and hotel check-ins. Both can be handled without drama. For border crossings, I unbutton the top two shirt buttons before I reach the counter, retrieve the passport while still in line, and button back up after I get my stamp. The border officer sees a passport. No one behind me sees a wallet.
Hotel check-in is even simpler. Hotels are generally lower-risk environments than outdoor markets or transit stations. You can reach under your shirt at the front desk without any real concern. But if you want to be completely seamless, you can briefly transfer the passport to a jacket pocket in the elevator on your way to the lobby so the check-in hand-off looks natural. Either way works.
The one time I always keep the passport in the neck wallet and do not pull it out until I absolutely need to: ATM visits. ATM surroundings are the highest-risk environment a traveler encounters in most destinations. Get your cash, pocket it quickly, keep walking. Do not stand at the ATM shuffling through a neck wallet sorting your receipts.
The travel vest is advertising. The neck wallet is invisible. One of those options works in your favor, and it is not the one with seventeen pockets on the outside of your shirt.
What Else Helps
The neck wallet system works better when you pair it with a few supporting habits. First, photograph your passport data page and your visa stamps and save them to a cloud folder you can access offline. If the actual passport is ever lost or stolen, you have documentation for the nearest consulate. Second, keep a handwritten note in your carry-on with the phone numbers for your bank's international collect line and your country's nearest embassy. You will never need it. But the two trips where I had a card freeze abroad, being able to call the right number immediately fixed the problem in ten minutes instead of three hours. Third, register for STEP (Smart Traveler Enrollment Program) if you are American. It takes five minutes and means the US embassy knows your itinerary if something goes sideways.
None of these extras cost anything. The VENTURE 4TH neck wallet itself costs less than most airport meals. And it will outlast your current passport. I have been using mine through fourteen countries across three continents, and the cord, the zipper, and the RFID lining are all exactly as they were on day one. The build quality is genuinely good for the price. I have paid more for neck wallets that fell apart in six months.
The system above costs you fifteen minutes to set up. The wallet that runs it costs less than a checked bag fee.
The VENTURE 4TH RFID neck wallet is rated 4.6 stars by 12,000+ travelers. Slim enough to disappear under a t-shirt, sturdy enough to survive a year of daily use abroad.
Amazon Check Today's Price on Amazon →